Showing posts with label network. Show all posts

Tuesday, 11 February 2014

How To Change MAC Address Easily (Windows)


What is MAC address? Mac address is a physical serial number and every networking devices include your personal computer has a MAC address. MAC address also can give out other user on your network about your computer name and some info like computer model, network card type, and your Internet Protocal (IP) address. For more info : Google yourself..
Mac Address Changer
1. Download software :-
Links : [MEGA]
           [DROPBOX]
           [GDrive]

2. Install the software like usual. (Run as administrator)

3. Click NO for registration and you'll see a message "successfully installation".
 "Click NO"
"Click OK"

4. Locate the program installed in All Programs. AnalogX > AnonyMac > AnonyMac.exe (Run it)

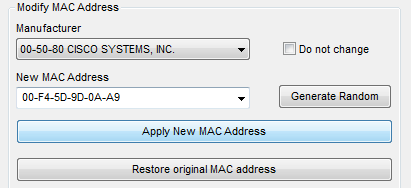
5. Setup with the adapter you're using to connect to internet. Restore to original if problem occurs.
"Use at your own risk"

Tuesday, 17 December 2013

How To Fix Logon Failure Account Currently Disabled (Windows XP)


This tutorial will teach you how to troubleshoot the sharing problem between Windows XP to Windows 7 or Windows 8. Example : Windows XP cannot access Windows 7, cannot access printers, shared folder, logon failure or disabled.

a) Logon failure : account currently disabled.
 (\\cranberry is a Windows 7 computer name)

1. Download : Link Layer Topology Discovery (LLTD) for Windows XP (FIX)
Link : [MEGA]     [Dropbox]     [Google Drive]
Install it. v5 for Windows XP SP2 and older and v6 for Windows XP SP3.

2. Go to Control Panel.
3. Click on User Accounts.
4. Select user account. (note : for another user, you must do the same thing like this again)
5. Click on Manage my network passwords.
6. Click Add.
7. Add some info. (cranberry) is my computer name (W7 Home Premium) with shared folder.


Server : Add your computer name (Windows 7) which was sharing folder : \\servername 

User name : Username in the computer (Windows 7) you've created : servername\username

Password : Password in the local user/group (Windows 7) you've created.


About the username & password (add/delete user)
this in Windows 7 Home Premium, use netplwiz.exe
if you use Windows 7 Ultimate or Windows Server, please use gpedit.msc

8. You're done. Try typing \\servername or \\ipaddress in Run box.
Computer name is servername. Use \\servername to get access to shared folder. Make sure the security setting of shared folder is correct (permission) Check here : [Click Here].

=======================================================================================

b) Logon failure : Guest account is currently disabled.

1. Run "gpedit.msc"

2. Go to Windows Settings > Security Settings > Local Policies > User Rights Assignment. Then, find the "Deny access to this computer from the network" and remove Guest
After that, restart your computer.

Workaround :- if you use Virtualization (VMware, VirtualBox) mostly if you quick install you'll get the problem b) if you use "administrator" as a username. I suggest you download & install the FIX first. I hope my article helps you.

Watch Video
Thursday, 12 December 2013

How to Check Computer Security Score


Check your computer security score easily using this software, this software will determine all sectors in your computer (Networking, Security, File Sharing, Backup, Management)

1. Download software.
Link 1 : [MEGA]
Link 2 : [Dropbox]
Link 3 : [Google Drive]

2. Install software (make sure run as administrator).

3. After that, the program will start and scan automatically.
This may took few minutes (if more than 5 minutes, try close (exit) the program and run again)
So, the score will be shown after finish scan.

To close the program, check your taskbar for the program icon, right click and click exit.


Wednesday, 11 December 2013

How To Create Local Web Server in Windows 8/8.1


Introducing the first in a series of simple to use yet powerful servers! This webserver is so easy to use, about the only thing you need to know how to do is drag and drop files, then just click on the 'Start' button, and your webserver is up and running.
1. Download software :- (size .zip 317KB)
Link 1 : [MEGA]
Link 2 : [Dropbox]
Link 3 : [Google Drive]


2. Install the web server, and click No (for registration).

3. Go to Start (Charm bar), find SimpleServer.WWW.exe

4. The above is your IP address (web server). After that, click "click here to set your web directory", select your .html and click Start..
> Creating HTML for beginner : [Click Here]
> Download HTML templates : [Click Here]

5.  If this appear, click (tick both option first) Allow access.

6. Now, minimize the program, check your IP Address, and insert it in URL browsers. For example : 192.168.175.132. You're done, this is viewable by all user in the local network.
This is plain .html, if you had directory it will be good like top cover.

Tutorial to create FTP : [Click Here]
Download HTML templates : [Click Here]
Watch Video (Fast Tutorial)

How To Create Local Web Server in Windows 7


Introducing the first in a series of simple to use yet powerful servers! This webserver is so easy to use, about the only thing you need to know how to do is drag and drop files, then just click on the 'Start' button, and your webserver is up and running.

1. Download software :- (size .zip 317KB)
Link 1 : [MEGA]
Link 2 : [Dropbox]
Link 3 : [Google Drive]

2. Install the web server, and click No (for registration).

3. Go to Start menu > All program > AnalogX > SimpleServer > WWW > SimpleServer.WWW.exe

-Run the program as administrator.


4. The above is your IP address (web server). After that, click "click here to set your web directory", select your .html and click Start.
> Creating HTML for beginner : [Click Here]
> Download HTML templates : [Click Here]

5. If this appear, click (tick both option first) Allow access.

6. Now, minimize the program, check your IP Address, and insert it in URL browsers. For example : 192.168.1.1. You're done, this is viewable by all user in the local network.
This is plain .html, if you had directory it will be good like top cover.

Tutorial to create FTP : [Click Here]
Download HTML templates : [Click Here]
Watch Video (Fast Tutorial)

How To Create HTML Files Easily


Creating HTML is easy, if you know what you doing. For people like me, I'm also not so good in editing html (still learning). So today, I'm gonna show you the easiest way for lazy people like me editing HTML.

(Offline Method)
1. Notepad (Well most beginner user don't know, right?)

-Type anything in the notepad and save as (select type : All files) and make sure the last input is .html at the name.


-This is the standard html editor.. in history. Nowadays, there's ton of software for editing html.


(Online Method)
2. quackit.com (Easier, fun and you can even create tables, form, etc in html)

-Edit, create anything, put everything to the html easily, they even gave out to you some sample templates if you want (at the option)

-After you've finished editing, check at left top corner, click on "Source" and select all, copy and paste to notepad and save as .html format. (see first picture)


What the use of this html? For Website :-
Windows 7/8 Web Server : [Click Here]
Windows 7/8 FTP Server : [Click Here]

Tuesday, 10 December 2013

How To Upload and Host HTML, CSS and Javascript Files


For those who want to share or host the HTML, CSS or Javascript to use in blog, widget, etc. Follow this simple trick (step by step with picture) using Google Drive (because it's free!)

1. Go to Google Drive and sign in using Google Account.


2. Upload your files (example : HTML, CSS or JS.) to the drive. Then, click on Share.

3. Click on Change and click on Public on the web, save.

4. Now, open the link in new tab.


Please READ carefully
5. After you open the link, COPY THE ID of the item. (example : 0Byc6OZ6ZvA6NZXl1eU9PWk9oQUE)

6. Now, change the URL and paste the ID you've copied : googledrive.com/host/PASTE-ID-HERE
You're done!
Tips :-
a) The link is permanent (unless you delete the item, move the item)
b) Save the link in notepad or another places because the link is not saved in your Google Drive.
c) If you don't want to save the link, make sure you know how to copy ID and use googledrive.com/host/
d) To use the link in widget or etc, use <script src="Link-Here" type="text/javascript"></script>

Watch Video